In this tutorial we'll connect to your Mirobot and calibrate it so that it's more accurate when drawing things
Step one: Connect to your Mirobot
Make sure you've already got your Mirobot on your WiFi network and can access it via its IP address or by bonjour if you have a Mac or Linux
Step two: calibrate the distance
In order to make Mirobot draw lines of exactly the right length we can calibrate how many steps it takes to move a set distance. You'll need a ruler to do this.
First, make sure you've got a pen fitted that's ready to draw and that Mirobot is on a piece of paper
Now, enter the longest length of line that you can fit on the paper and click the draw button. The longer the line is, the more accurate the calibration will be.
Step three: calibrate the turning angle (optional)
If you've completed step two, the motors should be calibrated so that the angles are also accurate. If Mirobot is not drawing an exact angle then you can calibrate this separately here.
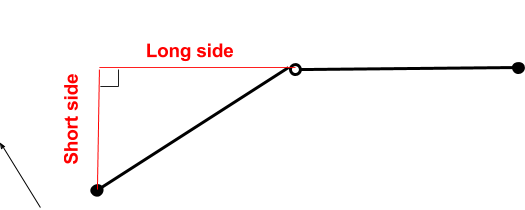
We will make Mirobot draw a line then rotate 360 degrees and draw another line. The lines should be perfectly straight. If they are not then you can increase or reduce the angle and repeat until they are straight. You'll need a protractor to measure how far you need to adjust the angle. If you do not have a protractor, you may calculate the angle required by solving the triangle with trigonometry: Angle = arctan(short side / long side). See image below.
Step four: calibrate the motors (optional)
The motors that are used in Mirobot have gears to make them turn slowly, but these gears also have some play in them which can make Mirobot less accurate when they change direction.
This calibration process will move the stepper motors a small number of steps backwards and forwards until you can detect how many steps it takes to pick up the slack in the gears.
Increase the amount of steps as high as you can without making Mirobot move then click stop when you're on the limit.